
Google Maps is not just a smartphone application; it is a web map application server owned by Alphabet Inc and has been one of the most widely used tools by users in the location and geo reference segment for years. It not only offers interactive map images on the web but also provides satellite photos of the entire world and different pre-defined routes or locations. The main purpose for which these functionalities are used is to locate us in time and space, ensuring how long it will take us to reach a certain point on the map and what route we need to take to achieve the goal.

However, location is just one of the functions of Google Maps. Over the years, it has acquired new developments and updates that make it even more robust. Nowadays, it provides users with all kinds of information, such as the website of the chosen place, the opening and closing hours, the busiest areas of a certain area, traffic-laden stretches, comments and opinions from people who had the opportunity to visit, among many others.
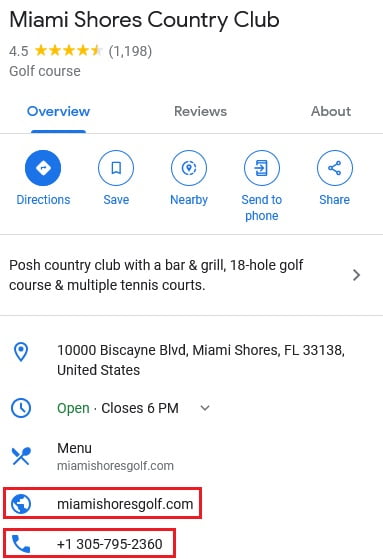
Currently, the most sought-after type of data is related to contacting these places, as many people want to find out certain things or have even more details than those presented in Google Maps. In this regard, the application does not lag behind, as it provides us, for example, with the phone number of the places, as well as the website that allows us to obtain more information about them. The issue is that many people enter the app but do not know where to find this information, and therefore, they miss out on obtaining it. That’s why in this tutorial, we will explain the step-by-step process of how to view the website and phone number of a place with Google Maps, so that no one is left out, and everyone can make the most of the tool’s potential.
Step 1: Enter the Google Maps app
The first action we need to take to obtain information about the website and phone number of the place we are looking for is to enter the Maps from Google application. Since this data is obtained directly from within the app, we must enter it. To do this, we need to tap the Google button that is usually on the main screen of the device, encompassing all the apps that belong to the Android or iOS operating system and are installed by default on the device, you can also access trough a web browser ( https://www.google.com/maps/ ). When the dropdown with all Google apps opens, we need to tap on the one that says Maps, as shown in the following image.
Step 2: Start the search

To get the correct information, a fundamental step is to find the place about which we want to know this data. The vast majority of places are registered in Google Maps, and all we have to do is proceed to find them. At the top of the screen, we can see a white bar that says “Search here,” and we need to stand over that box to start. We must write the term that resembles the place, and in this way, a dropdown with different options opens.
Step 3: Choose the correct option
Once that dropdown opens, we have different options for places to visit, although the only one that interests us is the one that corresponds to the search we are doing. It is crucial to pay attention to the different alternatives and end up selecting the correct one since otherwise, we may get false information. We only need to press the one that we believe corresponds to what we are looking for.
Step 4: Tap on the place’s name
After tapping the correct option, a screen opens with a lot of data about the place, such as the rating, the status (whether it is closed or open), the time it takes to get there, among many others. What we have to do at this point is press on the name of the place because that way, we are taken to the next screen.
Step 5: Go to the information section
Within this screen, we have a list of sections that we can access, each with its respective characteristics. Generally, when we tap on the name of the place, it takes us directly to the information tab, where we have all the data we need. In case we are not in that part, we must tap where it says Information, and there we will be much closer to completing the process.
Step 6: Press on “See all”
After finishing step 5, we can already see certain information, such as the address of the place, and even the website, one of the pieces of information we were looking for. However, there are many others that are hidden and are not visible on the first screen. So at that point, we need to press the button that says “See all”, highlighted in light blue just below the “Suggest an edit” option.
After performing that action, the screen is presented much more complete, and it is right there below where we can see the data we were looking for. The phone icon displays the number we can contact to inquire about anything. Below that field, we can see the icon of a globe, and right next to it is the information about the website of the place. It is worth mentioning that if this information is not displayed, it is because these data do not exist or at least are not registered in Google Maps.
![How to view if there are photos and contribute visual content on Google Maps? [Panoramic photos, 360º, and more]](https://findnearmenow.com/wp-content/uploads/2024/02/banner-para-blog-marketing-digital-azul-marino-y-turquesa-minimalista-22-1024x576.jpg)