Applications related to geo-reference and location are becoming increasingly prominent in our society as they have assertively integrated into our lives. Nowadays, it’s challenging to imagine what life would be like without the famous GPS, which helps us navigate not only in unfamiliar places, such as when we’re on vacation or in another city but also in our day-to-day activities. Despite our intuition or knowledge guiding us to the right places, everything becomes much simpler and safer when we use a tool of this kind to determine the exact route to a specific address.

Undoubtedly, the best and most widely used among those available on the market is Google Maps, it’s Google app, proving its efficiency over time. Currently, there are millions of users worldwide using it, prompting developers to constantly design new features and updates to make everything even more straightforward.
For all the reasons mentioned, it has evolved beyond being an app that merely helps us reach specific locations. It now serves many other purposes, such as the ability to share opinions about certain places, view what other users have said, know details like opening and closing hours, obtain more information like phone numbers or the website of local businesses, among many other features. Today, we will talk about a specific functionality: sharing maps or locations in real-time with other users through Google Maps, something many want to do but not everyone knows how. It’s something that can be done easily, and that’s why, in the following tutorial, we will explain step by step how to share a map and how to send our real-time location.
Steps to share location with Google Maps app
Step 1: Open the Google Maps application
As we want to share the location directly from Google Maps, the first action we need to take is to enter to the interactive app. We emphasize this because it’s common for users to want to share their real-time location through other means like WhatsApp, but in this case, we will start the process from the platform itself. To enter, simply touch the Google button on the main screen of the phone, and then press the Maps logo, which is among the other Google apps that come pre-installed on the phone. Another way is to open in a web browser (Google Chrome, Mozilla Firefox, Microsoft Edge) the URL: https://www.google.com/maps/
Step 2: Press the profile button
Once we enter the platform, we find ourselves on the home screen, where a search is usually performed. In our case, we won’t perform any searches as we want to share our current location. To do this, we need to go to the upper-right corner of the screen, where we can see, right next to the search bar, a large letter. This is the profile button, and we need to press it to move on to the next step.
Step 3: Tap on “Share Location”
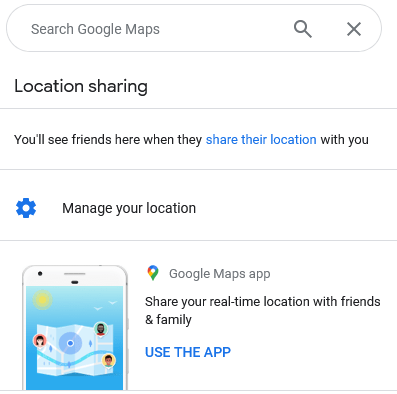
The option to send the location in real-time is easy to find. Once we press the profile access, we are invited to manage the Google account, and various alternative actions are opened to us. The fourth option that can be identified (from top to bottom) is “Share Location,” and that’s where we need to tap to move on to the next screen. In the next image, it can be clearly seen which option to press.
After doing so, another similar screen is presented, inviting us to see the details of what sharing the location in real-time entails, as it’s not just about localization. If we want to access that detail, we need to tap the button that says “Learn what information will be shared,” and if we want to proceed directly with the process, we have to press the “Share Location” button again, this time painted blue.
Step 4: Allow access to contacts
In principle, we need to clarify that this step is not mandatory or always necessary to carry out, especially because if we’ve already done it before, this option does not appear directly. As we progress, there is a possibility that a message will appear asking us if we want to allow the application to access our contacts. This is done so that it is sent directly via text message to someone we have registered as a contact on the device. If we want to do it this way, we need to tap the option that says “Allow.”
Step 5: Complete the sending process
Before finishing the real-time location sending, we need to decide whether we want to do it “For 1 hour” or until we manually deactivate the option. We recommend doing it for 1 hour, but either option is valid. After completing that configuration, we have to decide through which medium we will send it. We can do it via text message by simply selecting some of the contacts that appear on the first screen (or searching for one), or choose one of the options that appear at the bottom, such as Facebook Messenger, WhatsApp, Gmail, among others.
In case we select a contact, we simply have to hit send, and if we choose one of the other platforms, we have to finish the process in those applications.
How to share a map or directions
Step 1: Open the application
As in the first tutorial presented, the dynamic at the beginning is the same, as the action is performed directly from the application itself. So, the first thing we have to do is open the Google Maps app, simply by tapping the Google icon and pressing the Maps option once all the applications are opened.
Step 2: Perform the search
In the first screen presented to us once we enter, we can see a search bar at the very top that says “Search here.” There, we need to tap to enable the keyboard and then start typing the term related to the place we need to go. When we start typing, a dropdown with different result options that the platform is finding opens, and at this point, it’s crucial to pay attention to select the correct option.
Step 3: Select the share option
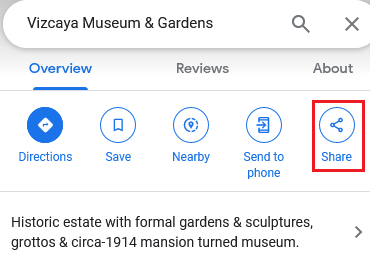
After tapping on the indicated site we need to reach or want to share, a screen is presented with many details such as the exact address, the rating other users have given, directions, and more. Right in the middle are some action options, including “Share” (it’s the last one to the far right). We have to press that button to move on to the final step.
Step 4: Complete the sending process
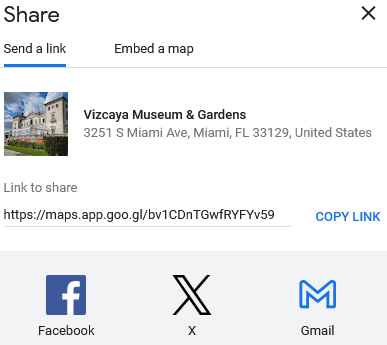
This final part of the process is the same as the previous tutorial of sharing the real-time location. We have various options: send by text message or do it through other applications like Facebook or WhatsApp. If we choose the first, we need to find a contact to finish sending, and if we want to do it through another platform, we simply need to select the indicated application and finish the process there.
![How to view if there are photos and contribute visual content on Google Maps? [Panoramic photos, 360º, and more]](https://findnearmenow.com/wp-content/uploads/2024/02/banner-para-blog-marketing-digital-azul-marino-y-turquesa-minimalista-22-1024x576.jpg)